
Showing posts with label JQuery. Show all posts
Showing posts with label JQuery. Show all posts
Fade In Fade Out Effect Using JQuery


n this article we are going to use JQuery to create a fade in fade out effect. The fade in fade out effect can be used to notify the user that some operation has happened. The fade in will capture the user's attention and the fade out will make sure that the space is not occupied by the stale message.
Recommend Reading:
If you are new to JQuery then we suggest that you check out the JQuery documentation about using the effects.
http://docs.jquery.com/Effects
Implementing Fade In Fade Out Effect:
JQuery has many effects already defined in its strong belt of tricks. This includes fadeIn, fadeOut, slideUp, slideDown etc. Unfortunately, the FadeInFadeOut effect is not included in the library. But that is OK! because we can easily add this effect to the jQuery functions and reuse the effect at our own pleasure.
Here is the one way to create the effect:
$("#divMessage").html("Item has been saved").fadeIn(2000, function()
{
$(this).fadeOut(2000);
});
First, the fadeIn is fired and after 2 seconds the callback function is fired which in turn fires the fadeOut function. This will work as expected but writing this amount of code everytime we need a fadeInFadeOut effect is just too much. Let's see how we can reduce some code.
In the code below we have extended the fn (function) of jQuery base library by attaching our own personal function called fadeInFadeOut.
jQuery.fn.fadeInFadeOut = function(speed) {
return $(this).fadeIn(speed,
function() {
return $(this).fadeOut(speed);
});
}
Now we can use the above function like this:
$("#divMessage").html("Item has been saved").fadeInFadeOut(2000);
And here is the effect:

There is another way to produce the same effect. Check out the following code:
$("#divMessage").html("Item has been saved").fadeIn(2000).fadeOut(2000);
In the above code the message will fadeIn at the rate of 2 seconds and then fade out after 2 seconds.
Conclusion:
JQuery provides many build-in effects to ease the developer pain. JQuery also provides the animate function which is used to create custom animations. You can also extend the JQuery functions by attaching your own functions.
I hope you like this article, now go and get high!
Recommend Reading:
If you are new to JQuery then we suggest that you check out the JQuery documentation about using the effects.
http://docs.jquery.com/Effects
Implementing Fade In Fade Out Effect:
JQuery has many effects already defined in its strong belt of tricks. This includes fadeIn, fadeOut, slideUp, slideDown etc. Unfortunately, the FadeInFadeOut effect is not included in the library. But that is OK! because we can easily add this effect to the jQuery functions and reuse the effect at our own pleasure.
Here is the one way to create the effect:
$("#divMessage").html("Item has been saved").fadeIn(2000, function()
{
$(this).fadeOut(2000);
});
First, the fadeIn is fired and after 2 seconds the callback function is fired which in turn fires the fadeOut function. This will work as expected but writing this amount of code everytime we need a fadeInFadeOut effect is just too much. Let's see how we can reduce some code.
In the code below we have extended the fn (function) of jQuery base library by attaching our own personal function called fadeInFadeOut.
jQuery.fn.fadeInFadeOut = function(speed) {
return $(this).fadeIn(speed,
function() {
return $(this).fadeOut(speed);
});
}
Now we can use the above function like this:
$("#divMessage").html("Item has been saved").fadeInFadeOut(2000);
And here is the effect:
There is another way to produce the same effect. Check out the following code:
$("#divMessage").html("Item has been saved").fadeIn(2000).fadeOut(2000);
In the above code the message will fadeIn at the rate of 2 seconds and then fade out after 2 seconds.
Conclusion:
JQuery provides many build-in effects to ease the developer pain. JQuery also provides the animate function which is used to create custom animations. You can also extend the JQuery functions by attaching your own functions.
I hope you like this article, now go and get high!
GridView Confirmation Box Using JQuery BlockUI
JQuery is the most popular JavaScript library. One of the main reasons for its fame is the plugin architecture. Anyone can create a separate library that leverage the JQuery library. In this article we are going to look at the BlockUI library which is used to block the user screen while performing a task.
What Does Blocking Mean?
There are number of different words to define the behavior of blockUI library. It can be called blocking or freezing the page. The main purpose to block the page is to get the user's focus on a small portion of the page or to perform the action on the background. The blocking aspect will keep the user from clicking any other control on the page.
Downloading the BlockUI Library:
You can download the BlockUI library using the following URL:
BlockUI Plugin
Creating a Simple Block Screen:
First, make sure that you have added a script reference to the JQuery library and the BlockUI library as shown below:
For our simply demo we will use a button control to block the screen and display a small message on the center of the screen. Here is the DIV control that will be displayed as a message when the screen is blocked.
The above DIV will be displayed when the following button is clicked.
The openHelp function is responsible for blocking the UI and displaying the DIV on the page.
function openHelp() {
$.blockUI({ message : $('#divHelp')});
}
When you run the page and click on the button you will see the following result:
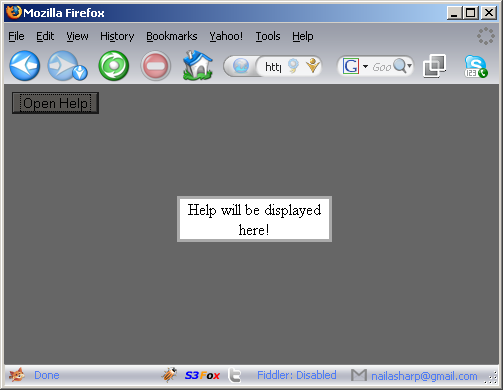
As, you can see in the above image the whole screen is blocked and only a small portion (DIV) is available to the user to interact. Now, let's take a look at how we can use BlockUI to replace boring confirmation messages.
Deleting Items Using GridView with BlockUI Confirmations:
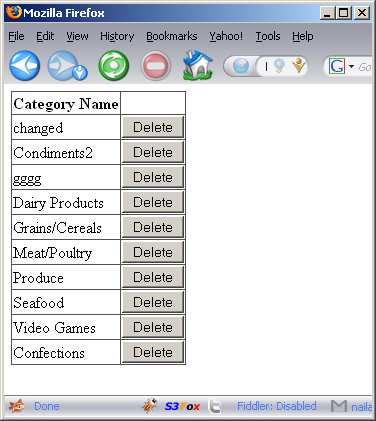
We are going to populate the GridView control with data from the Northwind database "Categories" table. Take a look at the following code which uses LINQ to SQL as a data layer to populate the GridView control.
private void BindData()
{
using (var northwind = new NorthwindDataContext())
{
gvCategories.DataSource = northwind.Categories;
gvCategories.DataBind();
}
}
And here is the ASPX GridView code:
' />
')" />
When you run the above code you will see the following page:
The divConfirmBox is used to display a custom confirmation box to the user. Here is the code for the DIV.
There are couple of things to note here. First, the divConfirmBox is not inside the GridView control. If it was inside the GridView ItemTemplate then it would have been rendered with each row. This would have caused a lot of extra code to be rendered with the GridView control thus making the page slower and killing performance.
We have placed the popup DIV outside the GridView control and used a HiddenField to hold the selected row Id which in this case is CategoryID. The button inside the DIV uses UseSubmitBehavior = false which will allow the button to perform a postback.
Each row contains a delete button which is used to block the user's page and shows a confirmation box to the user when clicked. The showDeleteConfirmation function is also responsible for transferring the selected categoryID into a categoryId global variable. Check out the screen shot below:

Here is the showDeleteConfirmation function:
var categoryId; // global variable
function showDeleteConfirmation(cId) {
categoryId = cId
$.blockUI({ message : $('#divConfirmBox') });
}
As, you can see in the screen shot above when the user clicks the delete button a custom confirmation box is shown to alarm the user that the selected record will be deleted. If the user press the "NO" button then the UI is unblocked and the normal processing resumes. If the user clicks the "OK" button then we fire the OnClick event handler of the button. Before the server side event of the button is fired the OnClientClick is triggered. The OnClientClick fires the deleteRecord function which moves the categoryId into a hidden field as shown below:
function deleteRecord() {
$("#hfCategoryId").val(categoryId);
$.unblockUI();
}
Finally, here is the Btn_DeleteRecord event which is handled on the server side:
protected void Btn_DeleteRecord(object sender, EventArgs e)
{
var categoryId = Int32.Parse(hfCategoryId.Value);
using(var northwind = new NorthwindDataContext())
{
var category = (from c in northwind.Categories
where c.CategoryID == categoryId
select c).SingleOrDefault();
northwind.Categories.DeleteOnSubmit(category);
northwind.SubmitChanges();
BindData();
}
}
Conclusion:
In this article we learned how to use the JQuery BlockUI plug in to create block pages. We also learned how we can easily replace the boring JavaScript confirmation box with more attractive blockUI message box. In the next article we are going to see some cool blockUI library features with the JQuery Ajax framework.
What Does Blocking Mean?
There are number of different words to define the behavior of blockUI library. It can be called blocking or freezing the page. The main purpose to block the page is to get the user's focus on a small portion of the page or to perform the action on the background. The blocking aspect will keep the user from clicking any other control on the page.
Downloading the BlockUI Library:
You can download the BlockUI library using the following URL:
BlockUI Plugin
Creating a Simple Block Screen:
First, make sure that you have added a script reference to the JQuery library and the BlockUI library as shown below:
For our simply demo we will use a button control to block the screen and display a small message on the center of the screen. Here is the DIV control that will be displayed as a message when the screen is blocked.
The above DIV will be displayed when the following button is clicked.
The openHelp function is responsible for blocking the UI and displaying the DIV on the page.
function openHelp() {
$.blockUI({ message : $('#divHelp')});
}
When you run the page and click on the button you will see the following result:
As, you can see in the above image the whole screen is blocked and only a small portion (DIV) is available to the user to interact. Now, let's take a look at how we can use BlockUI to replace boring confirmation messages.
Deleting Items Using GridView with BlockUI Confirmations:
We are going to populate the GridView control with data from the Northwind database "Categories" table. Take a look at the following code which uses LINQ to SQL as a data layer to populate the GridView control.
private void BindData()
{
using (var northwind = new NorthwindDataContext())
{
gvCategories.DataSource = northwind.Categories;
gvCategories.DataBind();
}
}
And here is the ASPX GridView code:
')" />
When you run the above code you will see the following page:
The divConfirmBox is used to display a custom confirmation box to the user. Here is the code for the DIV.
There are couple of things to note here. First, the divConfirmBox is not inside the GridView control. If it was inside the GridView ItemTemplate then it would have been rendered with each row. This would have caused a lot of extra code to be rendered with the GridView control thus making the page slower and killing performance.
We have placed the popup DIV outside the GridView control and used a HiddenField to hold the selected row Id which in this case is CategoryID. The button inside the DIV uses UseSubmitBehavior = false which will allow the button to perform a postback.
Each row contains a delete button which is used to block the user's page and shows a confirmation box to the user when clicked. The showDeleteConfirmation function is also responsible for transferring the selected categoryID into a categoryId global variable. Check out the screen shot below:
Here is the showDeleteConfirmation function:
var categoryId; // global variable
function showDeleteConfirmation(cId) {
categoryId = cId
$.blockUI({ message : $('#divConfirmBox') });
}
As, you can see in the screen shot above when the user clicks the delete button a custom confirmation box is shown to alarm the user that the selected record will be deleted. If the user press the "NO" button then the UI is unblocked and the normal processing resumes. If the user clicks the "OK" button then we fire the OnClick event handler of the button. Before the server side event of the button is fired the OnClientClick is triggered. The OnClientClick fires the deleteRecord function which moves the categoryId into a hidden field as shown below:
function deleteRecord() {
$("#hfCategoryId").val(categoryId);
$.unblockUI();
}
Finally, here is the Btn_DeleteRecord event which is handled on the server side:
protected void Btn_DeleteRecord(object sender, EventArgs e)
{
var categoryId = Int32.Parse(hfCategoryId.Value);
using(var northwind = new NorthwindDataContext())
{
var category = (from c in northwind.Categories
where c.CategoryID == categoryId
select c).SingleOrDefault();
northwind.Categories.DeleteOnSubmit(category);
northwind.SubmitChanges();
BindData();
}
}
Conclusion:
In this article we learned how to use the JQuery BlockUI plug in to create block pages. We also learned how we can easily replace the boring JavaScript confirmation box with more attractive blockUI message box. In the next article we are going to see some cool blockUI library features with the JQuery Ajax framework.
Using the Ajax control toolbox with jQuery (and ASP.NET MVC)
Using the Ajax control toolbox with jQuery (and ASP.NET MVC)
You may have thought that by jumping on ASP.NET MVC that you have to leave behind all the cool Ajax Control Toolbox controls.. or more than likely you realize that it’s possible to use them, but one has to be a “JavaScript Rocket Scientist” to use them.
You may have thought that by jumping on ASP.NET MVC that you have to leave behind all the cool Ajax Control Toolbox controls.. or more than likely you realize that it’s possible to use them, but one has to be a “JavaScript Rocket Scientist” to use them..
It’s really not, but you do need a couple things to use them.. First of all go here (Bertrand Le Roy’s blog) and pick up the jQuery plugin that let’s you instantiate MS Ajax Behaviors. Next go here to the Ajax Control Toolbox project and get both the ScriptFilesOnly project and the Source code as with MVC you won’t need anything but the JS files since the source/DLLs are for WebForms-related controls, but the Source code contains the debug version of the JS files which we’ll need (By the way, 6 months from now that link to the Ajax Control Toolbox will be old so you’ll probably want to get the latest release, and not the release I pointed at).
Now let’s look at how you would wire up the DropShadow behavior (aka the DropShadow Extender). First of all, we need to figure out the references. Thanks to Visual Studio 2008, this is easy. Using the text editor/view of your choice, open up the DropShadowBehavior.Debug.js from the Source project (not the ScriptOnly zip); this is located under the zip file at .\AjaxControlToolkitSource\AjaxControlToolkit\DropShadow. When you open up the file you will see the following at the top of the file:
1: ///
2: ///
3: ///
4: ///
5: ///
6: ///
7: ///
The first 3 items are all the standard MS Ajax client library, so we’ll need to reference those. Now we need to look at the last 4 items. If you open up the files from the ScriptOnly zip file, you aren’t going to find these exact named files; to find the right file look at the end of the file name to find the actual file you need to reference. You’ll also need to reference jQuery and Bertrand Le Roy plugins. Here’s what the references look like:
1:
2:
3:
4:
5:
6:
7:
8:
9:
10:
11:
Here’s how we can then make every div with a “box” class to have a drop shadow:
1: $().ready(function() {
2: $(".box").create(AjaxControlToolkit.DropShadowBehavior,
3: {
4: Opacity: 0.3,
5: Rounded: false,
6: TrackPosition: true,
7: Width: 5
8: });
9: });
See that JSON string (lines 3-8). If you look at those settings closely and compare them to the Ajax Control Toolbox documentation web site, you’ll see that these are the same settings that the extender uses which should make everything easy.
source: theruntime
JQuery in ASP.Net
JQuery in ASP.Net
JQuery is another javascript library which eases javascript developemt - and it also includes some Ajax functionality.
JQuery is another javascript library which eases javascript developemt - and it also includes some Ajax functionality.
jQuery is a fast, lightweight JavaScript library that is CSS3 compliant and supports many browsers. The jQuery framework is extensible and very nicely handles DOM manipulations, CSS, AJAX, Events and Animations.
It is totally different from JavaScript because it is a language whereas jQuery is a library written using JavaScript.
You can download the source code & plugins and read some excellent tutorials at the JQuery website. jQuery was created by John Resig.
Display an alert on asp:Button click using jQuery:
Add a Button element to the page as shown below:
Now in order to tell the browser to perform some action using jQuery as soon as the document is ready or loaded, use this block:
Add your code in the function block
source: 24x7aspnet.blogspot
JQuery is another javascript library which eases javascript developemt - and it also includes some Ajax functionality.
JQuery is another javascript library which eases javascript developemt - and it also includes some Ajax functionality.
jQuery is a fast, lightweight JavaScript library that is CSS3 compliant and supports many browsers. The jQuery framework is extensible and very nicely handles DOM manipulations, CSS, AJAX, Events and Animations.
It is totally different from JavaScript because it is a language whereas jQuery is a library written using JavaScript.
You can download the source code & plugins and read some excellent tutorials at the JQuery website. jQuery was created by John Resig.
Display an alert on asp:Button click using jQuery:
Add a Button element to the page as shown below:
Now in order to tell the browser to perform some action using jQuery as soon as the document is ready or loaded, use this block:
Add your code in the function block
source: 24x7aspnet.blogspot
