
GridView Confirmation Box Using JQuery BlockUI


JQuery is the most popular JavaScript library. One of the main reasons for its fame is the plugin architecture. Anyone can create a separate library that leverage the JQuery library. In this article we are going to look at the BlockUI library which is used to block the user screen while performing a task.
What Does Blocking Mean?
There are number of different words to define the behavior of blockUI library. It can be called blocking or freezing the page. The main purpose to block the page is to get the user's focus on a small portion of the page or to perform the action on the background. The blocking aspect will keep the user from clicking any other control on the page.
Downloading the BlockUI Library:
You can download the BlockUI library using the following URL:
BlockUI Plugin
Creating a Simple Block Screen:
First, make sure that you have added a script reference to the JQuery library and the BlockUI library as shown below:
For our simply demo we will use a button control to block the screen and display a small message on the center of the screen. Here is the DIV control that will be displayed as a message when the screen is blocked.
The above DIV will be displayed when the following button is clicked.
The openHelp function is responsible for blocking the UI and displaying the DIV on the page.
function openHelp() {
$.blockUI({ message : $('#divHelp')});
}
When you run the page and click on the button you will see the following result:
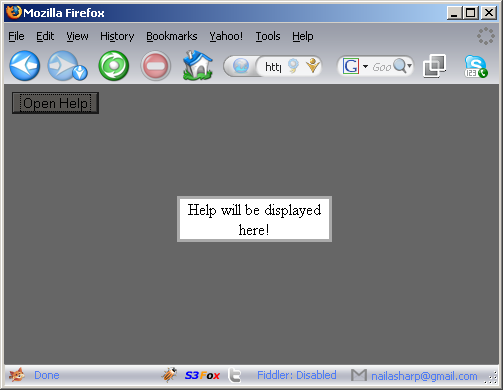
As, you can see in the above image the whole screen is blocked and only a small portion (DIV) is available to the user to interact. Now, let's take a look at how we can use BlockUI to replace boring confirmation messages.
Deleting Items Using GridView with BlockUI Confirmations:
We are going to populate the GridView control with data from the Northwind database "Categories" table. Take a look at the following code which uses LINQ to SQL as a data layer to populate the GridView control.
private void BindData()
{
using (var northwind = new NorthwindDataContext())
{
gvCategories.DataSource = northwind.Categories;
gvCategories.DataBind();
}
}
And here is the ASPX GridView code:
' />
')" />
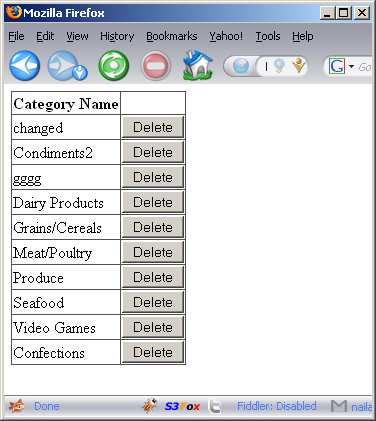
When you run the above code you will see the following page:
The divConfirmBox is used to display a custom confirmation box to the user. Here is the code for the DIV.
There are couple of things to note here. First, the divConfirmBox is not inside the GridView control. If it was inside the GridView ItemTemplate then it would have been rendered with each row. This would have caused a lot of extra code to be rendered with the GridView control thus making the page slower and killing performance.
We have placed the popup DIV outside the GridView control and used a HiddenField to hold the selected row Id which in this case is CategoryID. The button inside the DIV uses UseSubmitBehavior = false which will allow the button to perform a postback.
Each row contains a delete button which is used to block the user's page and shows a confirmation box to the user when clicked. The showDeleteConfirmation function is also responsible for transferring the selected categoryID into a categoryId global variable. Check out the screen shot below:

Here is the showDeleteConfirmation function:
var categoryId; // global variable
function showDeleteConfirmation(cId) {
categoryId = cId
$.blockUI({ message : $('#divConfirmBox') });
}
As, you can see in the screen shot above when the user clicks the delete button a custom confirmation box is shown to alarm the user that the selected record will be deleted. If the user press the "NO" button then the UI is unblocked and the normal processing resumes. If the user clicks the "OK" button then we fire the OnClick event handler of the button. Before the server side event of the button is fired the OnClientClick is triggered. The OnClientClick fires the deleteRecord function which moves the categoryId into a hidden field as shown below:
function deleteRecord() {
$("#hfCategoryId").val(categoryId);
$.unblockUI();
}
Finally, here is the Btn_DeleteRecord event which is handled on the server side:
protected void Btn_DeleteRecord(object sender, EventArgs e)
{
var categoryId = Int32.Parse(hfCategoryId.Value);
using(var northwind = new NorthwindDataContext())
{
var category = (from c in northwind.Categories
where c.CategoryID == categoryId
select c).SingleOrDefault();
northwind.Categories.DeleteOnSubmit(category);
northwind.SubmitChanges();
BindData();
}
}
Conclusion:
In this article we learned how to use the JQuery BlockUI plug in to create block pages. We also learned how we can easily replace the boring JavaScript confirmation box with more attractive blockUI message box. In the next article we are going to see some cool blockUI library features with the JQuery Ajax framework.
What Does Blocking Mean?
There are number of different words to define the behavior of blockUI library. It can be called blocking or freezing the page. The main purpose to block the page is to get the user's focus on a small portion of the page or to perform the action on the background. The blocking aspect will keep the user from clicking any other control on the page.
Downloading the BlockUI Library:
You can download the BlockUI library using the following URL:
BlockUI Plugin
Creating a Simple Block Screen:
First, make sure that you have added a script reference to the JQuery library and the BlockUI library as shown below:
For our simply demo we will use a button control to block the screen and display a small message on the center of the screen. Here is the DIV control that will be displayed as a message when the screen is blocked.
The above DIV will be displayed when the following button is clicked.
The openHelp function is responsible for blocking the UI and displaying the DIV on the page.
function openHelp() {
$.blockUI({ message : $('#divHelp')});
}
When you run the page and click on the button you will see the following result:
As, you can see in the above image the whole screen is blocked and only a small portion (DIV) is available to the user to interact. Now, let's take a look at how we can use BlockUI to replace boring confirmation messages.
Deleting Items Using GridView with BlockUI Confirmations:
We are going to populate the GridView control with data from the Northwind database "Categories" table. Take a look at the following code which uses LINQ to SQL as a data layer to populate the GridView control.
private void BindData()
{
using (var northwind = new NorthwindDataContext())
{
gvCategories.DataSource = northwind.Categories;
gvCategories.DataBind();
}
}
And here is the ASPX GridView code:
')" />
When you run the above code you will see the following page:
The divConfirmBox is used to display a custom confirmation box to the user. Here is the code for the DIV.
There are couple of things to note here. First, the divConfirmBox is not inside the GridView control. If it was inside the GridView ItemTemplate then it would have been rendered with each row. This would have caused a lot of extra code to be rendered with the GridView control thus making the page slower and killing performance.
We have placed the popup DIV outside the GridView control and used a HiddenField to hold the selected row Id which in this case is CategoryID. The button inside the DIV uses UseSubmitBehavior = false which will allow the button to perform a postback.
Each row contains a delete button which is used to block the user's page and shows a confirmation box to the user when clicked. The showDeleteConfirmation function is also responsible for transferring the selected categoryID into a categoryId global variable. Check out the screen shot below:
Here is the showDeleteConfirmation function:
var categoryId; // global variable
function showDeleteConfirmation(cId) {
categoryId = cId
$.blockUI({ message : $('#divConfirmBox') });
}
As, you can see in the screen shot above when the user clicks the delete button a custom confirmation box is shown to alarm the user that the selected record will be deleted. If the user press the "NO" button then the UI is unblocked and the normal processing resumes. If the user clicks the "OK" button then we fire the OnClick event handler of the button. Before the server side event of the button is fired the OnClientClick is triggered. The OnClientClick fires the deleteRecord function which moves the categoryId into a hidden field as shown below:
function deleteRecord() {
$("#hfCategoryId").val(categoryId);
$.unblockUI();
}
Finally, here is the Btn_DeleteRecord event which is handled on the server side:
protected void Btn_DeleteRecord(object sender, EventArgs e)
{
var categoryId = Int32.Parse(hfCategoryId.Value);
using(var northwind = new NorthwindDataContext())
{
var category = (from c in northwind.Categories
where c.CategoryID == categoryId
select c).SingleOrDefault();
northwind.Categories.DeleteOnSubmit(category);
northwind.SubmitChanges();
BindData();
}
}
Conclusion:
In this article we learned how to use the JQuery BlockUI plug in to create block pages. We also learned how we can easily replace the boring JavaScript confirmation box with more attractive blockUI message box. In the next article we are going to see some cool blockUI library features with the JQuery Ajax framework.
